Learn how to set up your Navimow i Series robotic mower without perimeter wires. Our complete guide covers RTK positioning, AI mapping, app configuration, and troubleshooting tips for flawless autonomous mowing.
Wire-Free Robot Mowing: Your Complete Navimow i Series Setup Guide
Imagine reclaiming your weekends from lawn maintenance—no more pushing a mower, no more planning your Saturday around yard work. The constant cycle of trimming, edging, and hauling equipment becomes a thing of the past when you let autonomous technology handle the job. Homeowners are increasingly turning to robotic solutions that promise freedom from weekend obligations and the satisfaction of a perfectly maintained yard without lifting a finger.
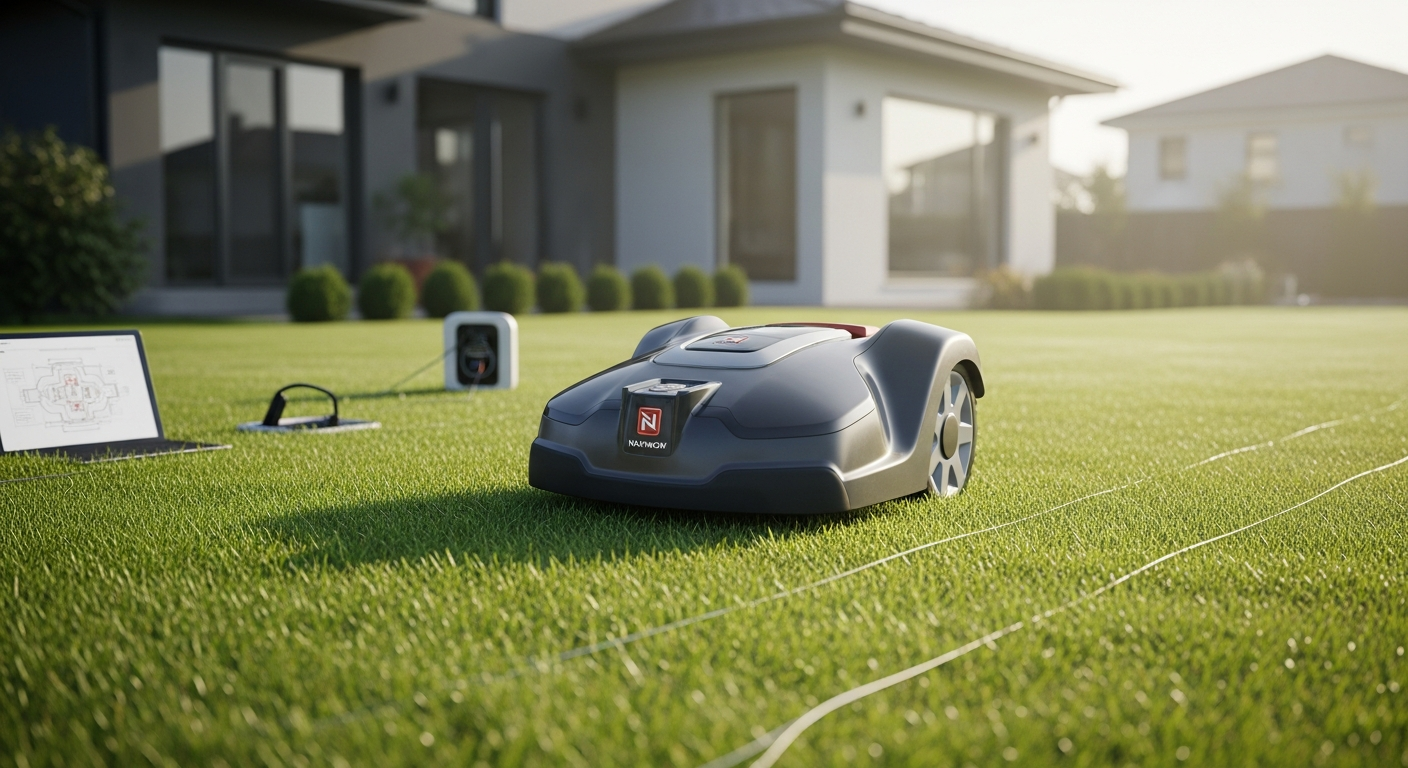
The Navimow i Series, launched in Europe in March 2024, fundamentally changes how you approach automated lawn care by combining cutting-edge RTK positioning with AI-powered mapping to eliminate the wire-installation headache that plagues traditional robotic mowers. Rather than spending days laying perimeter wires around your property, this system uses sophisticated real-time kinematic technology and computer vision to map and navigate your lawn with centimeter-level accuracy. The result is a setup process that takes hours instead of days, and a mowing experience that adapts intelligently to your specific outdoor environment.
Understanding Wire-Free Technology: How RTK + Vision Positioning Works
The RTK Revolution in Robotic Mowing
Real-Time Kinematic (RTK) positioning represents a quantum leap beyond conventional GPS systems that homeowners might be familiar with. Traditional GPS relies on satellite signals alone, which typically provide accuracy within several meters—far too imprecise for lawn mowing where you need centimeter-level accuracy. RTK technology solves this problem by using a ground-based reference station that calculates correction signals in real time, allowing the mower to know its position with extraordinary precision.
The customized RTK chip in the Navimow i Series integrates this capability directly into the mower's processing unit. Rather than depending solely on corrections transmitted from distant base stations, the system leverages local signal processing to maintain accurate positioning even in challenging environments where buildings, trees, or dense vegetation might interfere with standard satellite reception. This is the key advantage that allows the i Series to operate without perimeter wires—it simply knows where it is at all times.
The 140° Camera: Environmental Intelligence in Action
Paired with RTK positioning is a 140-degree field-of-view camera that serves as the mower's eyes. This wide-angle lens constantly captures the landscape ahead, feeding visual data into sophisticated AI algorithms that identify lawn boundaries, obstacles, and terrain variations in real time. The camera doesn't just record footage—it actively processes what it sees, distinguishing between a child's toy, a garden hose, a pet, or a parked bicycle within milliseconds.
This combination of RTK + Vision creates a redundant safety system. If RTK signals weaken temporarily, the camera-based vision system continues tracking the mower's position relative to known landmarks in your yard. Conversely, if lighting conditions make camera detection challenging, RTK positioning keeps the mower on course. The synergy between these two technologies ensures reliable operation across varying conditions throughout the day and across seasons.
Why Wire-Free Setup Transforms the Installation Experience
Traditional robotic mowers require you to install a perimeter wire around the entire boundary of your mowing area—a task that typically consumes an entire weekend and demands careful placement to avoid interference with sprinkler systems, underground utilities, or garden features. The wire creates an invisible fence that the mower cannot cross, but installation mistakes can render the entire system ineffective.
The wire-free approach eliminates this bottleneck entirely. The AI-powered mapping system identifies your lawn's natural boundaries by analyzing visual input and RTK positioning data. You can refine these boundaries within the app, adding precision without physically burying cables. This means you can be mowing your lawn within hours of unboxing rather than days of installation.
Pre-Installation Checklist: What You Need Before Setup Begins
Unboxing and Component Inspection
Your Navimow i Series arrives with several critical components that you should inspect before attempting setup. The mower unit itself is compact and lightweight compared to traditional push mowers. The charging dock comes as a separate piece—this is your mower's home base where it will automatically return for recharging between mowing sessions. You'll also receive power cables for the dock, connection hardware, and comprehensive documentation that walks you through the setup process.
Take time to verify that all components are present and undamaged. Check the mower's blade for any manufacturing defects or shipping damage. Inspect the charging dock's metal contacts to ensure they're clean and properly aligned. This initial inspection prevents frustration later when you discover a missing part or damaged component mid-setup.
Assessing Your Lawn and Selecting the Right Model
The Navimow i Series comes in two main models tailored to different lawn sizes. The i105 handles lawns up to 1/8 acre, while the i110 manages properties up to 1/4 acre. Selecting the correct model is crucial—an undersized mower won't finish your lawn in reasonable timeframes, while an oversized model wastes capability and money.
To assess your lawn size accurately, measure the length and width of your mowing area and multiply these dimensions. If you're unsure about your property's exact dimensions, most mapping services or property records list acreage. Additionally, consider the lawn's shape—irregular boundaries with multiple obstacles require different handling than open rectangular areas. The i Series' camera-based mapping adapts to any shape, but understanding your specific layout helps you choose the model that balances coverage and efficiency for your situation.
Optimal Charging Dock Placement for Signal Reception
The charging dock needs a permanent location where it will remain throughout the mowing season. This location should be reasonably flat and well-drained to prevent water accumulation around the dock's electrical connections. More importantly, the dock needs clear sight lines to the sky for RTK signal reception. Unlike traditional GPS, RTK can tolerate some obstruction, but extensive tree cover or building proximity directly overhead will degrade signal quality.
Position the dock where it receives at least partial sun exposure throughout the day. This both improves RTK reception and helps the dock's charging contacts stay clean and functional. Avoid placing the dock directly under trees where falling leaves and moisture can accumulate on the charging contacts. A location near the edge of your lawn, with modest vegetation overhead, typically provides the ideal balance of accessibility and signal reception.
Internet Connectivity Requirements
The Navimow i Series requires WiFi connectivity for several critical functions. The RTK base station communicates with the mower through your home WiFi network, providing the correction signals that enable centimeter-level accuracy. Additionally, the Navimow app communicates with your mower through the cloud, allowing you to monitor status, adjust schedules, and edit mowing maps from anywhere.
Verify that your WiFi network reaches the area where your charging dock will be located. If your current WiFi signal is weak in that zone, consider deploying a WiFi extender or mesh network expansion point before installation. Adequate connectivity ensures smooth initial setup and reliable operation throughout the mowing season. The bandwidth requirements are modest—robotic mower systems use minimal data—but the signal strength needs to be consistent.
Step-by-Step Installation: From Dock Placement to First Mow
Selecting and Preparing the Charging Dock Location
Once you've identified your ideal dock location based on the pre-installation criteria, prepare the area by clearing away debris, leveling the ground if necessary, and ensuring adequate drainage. The dock should sit on firm, level ground to maintain proper contact with the mower's charging pins. Avoid areas prone to standing water or soft soil that might shift under the dock's weight.
Position the dock with a clear view toward the center of your lawn. The mower needs to approach the dock from various angles during its first autonomous cycle as it learns your lawn's layout, so avoid placing the dock in a corner or tight space where approach angles are limited. A location within a few feet of a power outlet makes cable management easier and provides the electrical connection the dock requires.
Powering On and Initial System Calibration
Connect the dock to power according to the included instructions. Once powered, press the mower's power button and wait for the system boot sequence to complete—this typically takes 30-60 seconds. The mower will run internal diagnostics and establish initial connections to satellite networks. You may notice indicator lights cycling through colors as the system initializes.
The mower is calibrating its internal sensors and confirming that all major systems are functional. This is normal behavior during first startup. Allow the system to complete its initialization cycle without interruption. Once startup finishes, the mower will display a status indicating readiness for the next setup phase.
Connecting to the Navimow App
Download the official Navimow app on your smartphone from your device's app store. Create an account or log in with existing credentials. The app will guide you through pairing your physical mower unit. Enable Bluetooth on your phone and bring it within a few feet of the mower. The app will detect the mower and prompt you to confirm the connection.
After Bluetooth pairing, the app will ask you to connect your WiFi network for cloud communication. Enter your WiFi credentials and confirm the connection. The mower will now have both local Bluetooth communication with your phone and internet connectivity through your home network. This dual connectivity allows for local control when you're nearby and remote monitoring when you're away from home.
Running the AI-Powered Assistant Mapping Function
The Navimow app contains an automated mapping feature that analyzes your lawn and creates an initial mowing map without manual boundary drawing. To activate this feature, select "Create Map" or "Start Mapping" in the app and follow the on-screen prompts. The mower will begin moving around your lawn, using its 140-degree camera to identify grass edges, obstacles, and terrain features.
This initial mapping pass typically takes 15-30 minutes depending on your lawn's size and complexity. The mower moves in systematic patterns, ensuring comprehensive visual coverage of your entire mowing area. You can walk alongside it to observe the process, or let it work autonomously. The AI algorithms continuously analyze visual input and create a digital representation of your lawn in real time. Once the mapping pass completes, the app displays a visual map of your lawn with identified boundaries and detected obstacles highlighted for your review.
Fine-Tuning Your Mowing Map: Customization Through the App Interface
Accessing and Understanding the Map Editor
The Navimow app's map editor is your control center for customizing how your mower operates. Open the app and navigate to the map section to view the digital representation of your lawn that the AI created during the initial mapping pass. This map shows detected boundaries, identified obstacles, and the calculated mowing area. The editor allows you to adjust any element of this map to ensure accuracy before your mower begins autonomous operation.
The map editor uses intuitive touch controls—pinch to zoom in on specific areas, tap to add or remove features, and drag to adjust boundaries. The interface displays different colors for different features: grass areas typically appear green, no-mow zones appear red or another distinct color, and detected obstacles appear as labeled icons. This visual feedback helps you quickly assess whether the AI accurately interpreted your lawn's layout.
Drawing and Adjusting Lawn Boundaries with Precision
If the AI's initial boundary detection missed sections of your lawn or included areas you don't want mowed, you can manually adjust these boundaries using the map editor's drawing tools. Select the boundary editing mode and trace along your lawn's actual edges. The app provides snap-to-grid functionality that helps maintain clean, precise lines.
Pay special attention to areas where the lawn transitions to non-grass surfaces—driveways, patios, flower beds, or walkways. Accurate boundaries prevent the mower from attempting to navigate onto pavement or climbing into landscape features. Zoom in on complex areas like around trees, garden structures, or irregular lawn shapes to ensure the boundary follows your actual lawn contours rather than oversimplifying the layout.
Creating No-Mow Zones for Protected Areas
Beyond the outer boundary, you can designate specific areas within your lawn where the mower should never venture. These no-mow zones protect garden beds, children's play areas, decorative plantings, or any region you want to exclude from mowing. Select the no-mow zone tool in the map editor and draw around the perimeter of each protected area.
Common no-mow zones include formal flower beds, vegetable gardens, areas around deck supports, spots where you keep garden furniture during the season, and sections where family members enjoy outdoor activities. By clearly defining these zones, you ensure the mower respects the entire landscape layout you've designed. The mower will approach these zones but never cross into them, maintaining your yard's aesthetic while protecting whatever features or activities occupy those spaces.
Testing Map Accuracy Before Autonomous Operation
Before enabling fully autonomous mowing schedules, conduct a test run where you actively monitor the mower's performance against your map. Start the mower and watch it execute its planned mowing pattern while referencing the map display in your app. Observe whether the mower accurately follows the boundaries you defined, properly avoids the no-mow zones, and navigates around detected obstacles.
During this test, note any areas where the mower seems uncertain or hesitates. If the mower approaches obstacles differently than expected or struggles with a particular boundary section, return to the map editor and refine that area. Small adjustments to boundaries or obstacle definitions often resolve navigation issues. Completing this testing phase before full automation begins prevents problems like the mower attempting to mow areas you specifically protected or struggling with recurring docking failures.
Scheduling and Automation: Programming Your Mower for Consistent Results
Setting Up Recurring Mowing Schedules
Once your map is tested and accurate, establish a mowing schedule that keeps your lawn consistently trimmed. The Navimow app's scheduling feature allows you to set specific days and times when the mower automatically begins operation. Rather than a single daily schedule, you can create complex schedules that vary by day of the week—perhaps mowing Mondays, Wednesdays, and Fridays during growing season, then reducing to twice weekly during slower growth periods.
When setting schedule times, consider your household's daily rhythm and neighborhood noise considerations. Many homeowners prefer to schedule mowing for mid-morning or mid-afternoon, avoiding early mornings or evenings when noise is more noticeable. The Navimow i Series operates relatively quietly compared to gas-powered mowers, but consider your neighbors' preferences when establishing regular mowing times.
Frequency Recommendations Based on Grass Growth
The ideal mowing frequency depends on your grass type, local climate, and seasonal growth rates. During peak growing season—typically spring and early summer—many lawns benefit from mowing twice weekly to maintain an attractive height and encourage dense, healthy growth. As growth slows in mid-to-late summer or during dry periods, reducing to once weekly prevents over-mowing and unnecessary power consumption.
The general principle guiding robotic mower frequency is the "one-third rule"—never remove more than one-third of the grass blade length in a single mowing. Robotic mowers excel at frequent, light trimming that maintains this ratio. Rather than infrequent heavy cutting that leaves visible clipping lines and stresses the grass, schedule your Navimow to mow frequently and lightly. This approach produces a healthier lawn and means you can set schedules and essentially forget about mowing for entire weeks.
Weather-Based Scheduling Considerations
The Navimow i Series includes rain detection capabilities that prevent mowing during wet conditions. When rainfall is detected, the mower postpones its scheduled operation until grass has dried sufficiently. This feature protects your lawn from compaction damage that wet-weather mowing can cause and prevents the mower from becoming bogged down in muddy conditions.
You can also manually configure weather sensitivity through the app—some climates and grass types tolerate light mowing after brief showers, while others prefer to wait until complete drying. During rainy seasons or in areas with frequent afternoon thunderstorms, the automated rain detection handles much of the decision-making, ensuring your mower operates only under optimal conditions.
Automatic Charging and Task Resumption
When the mower's battery reaches a predetermined low level during a mowing session, it automatically navigates back to the charging dock using RTK positioning and visual landmarks. Once docked, it charges fully while remaining ready for immediate operation. If your mowing schedule calls for additional coverage that day, the mower automatically resumes its mowing pattern once charging completes.
This autonomous charging and resumption cycle means you never need to manually retrieve the mower, check battery levels, or manually return it to the dock. Large lawns that require more time than a single charge provides benefit especially from this feature—the mower simply charges and continues rather than sitting idle.
Obstacle Avoidance and Safety Features in Action
The 140° Camera and Advanced Object Detection
The Navimow i Series' 140-degree field-of-view camera serves as the primary obstacle detection system, with AI algorithms trained to recognize over 150 different types of common garden objects. This comprehensive training means the mower doesn't simply detect "obstacles"—it identifies specific items like bicycles, garden hoses, toys, potted plants, patio furniture, and pet structures. This specificity allows the mower to maintain appropriate safety distances for different object types.
The camera continuously scans the landscape at 30-60 frames per second, providing the AI with constant visual updates. If a child's ball rolls into the mower's path, the system detects it immediately and plans avoidance. If a neighbor's cat wanders into your yard during a mowing cycle, the obstacle detection identifies the animal and steers around it safely. This real-time responsiveness far exceeds older robotic systems that relied on simple bump sensors or limited-range proximity detection.
AI Algorithms and Collision Prevention
Behind the camera feed lies sophisticated machine learning trained on thousands of real-world lawn scenarios. These algorithms predict movement patterns and anticipate potential collisions before they occur. Rather than reacting only when an object is immediately in the mower's path, the AI calculates approach trajectories and modifies course early enough to avoid contact entirely.
The system maintains a dynamic safety buffer that adjusts based on the mower's current speed and the object type detected. Approaching a stationary object like a bench allows a tighter buffer than approaching a moving object like a child or pet. The algorithms continuously optimize this balance between safety and efficiency, ensuring the mower never comes dangerously close to people or property while still covering your lawn thoroughly.
Safety Buffer Zones and Distance Maintenance
You can establish additional safety buffer zones around sensitive areas through the app—perimeters that the mower treats as no-mow areas even if the AI doesn't detect an obstacle. These buffers provide extra protection for areas like decks, pools, or garden structures where you want guaranteed clearance.
The combination of real-time camera detection, algorithmic prediction, and user-defined buffer zones creates multiple layers of safety. Even if the camera temporarily loses sight of an obstacle due to changing light or angle, the mower's planned trajectory already accounts for the buffer zone. Even if the AI misidentifies an object's classification, the mower maintains safe distance anyway.
Child and Pet Safety Considerations
The obstacle detection system specifically includes training for detecting children and pets. When these vulnerable populations are identified in the mower's path, the system triggers immediate avoidance responses. However, active supervision remains important—avoid allowing children or pets to wander freely in your yard during scheduled mowing times.
Set your mowing schedules for times when your household typically isn't using the yard. Many families schedule mowing for mid-morning or mid-afternoon on weekdays when kids are in school. During weekends when children might play outside, either disable automated scheduling and manually start the mower only when you've verified the yard is clear, or establish a family routine that everyone understands the mower's schedule.
Troubleshooting Common Setup Issues and RTK Signal Problems
Diagnosing Weak or Unstable RTK Signals
If your mower displays RTK signal warnings or seems uncertain about its position, the issue typically stems from insufficient satellite coverage or signal blockage at your dock location. RTK requires clear sight lines to multiple satellites, particularly toward the southern sky in Northern Hemisphere locations. Dense tree cover, nearby buildings, or other structures that block this view degrade signal quality.
To diagnose the issue, open the app and check the RTK signal strength indicator—usually displayed as a bar graph or signal quality percentage. If signal strength is consistently below 80% or fluctuates significantly, your dock location likely needs adjustment. Temporarily move the dock a few feet in different directions and note how the signal changes. Even small relocations sometimes dramatically improve reception.
Repositioning Strategies for Improved Reception
If your current dock location shows weak RTK signals, consider relocating to a position with a more open sky view. Move the dock away from large trees, if possible, and ensure it has clear sight lines toward open sky rather than enclosed by vegetation or structures. Some homeowners find success elevating the dock slightly on a small platform—even a few inches higher can improve satellite reception when dock placement options are limited.
Alternatively, if your charging dock location is architecturally constrained, explore whether an RTK correction service subscription might improve performance in marginal signal environments. Some regional RTK services provide better correction data than the default Navimow system, potentially allowing reliable operation in areas where standard signals are borderline.
Resolving App Connectivity and Bluetooth Pairing Errors
Connection problems between your smartphone and the mower usually stem from interference, distance, or account synchronization issues. Bluetooth signals operate at short range—typically 30-100 feet depending on obstacles. If you're trying to control the mower from a distance exceeding your Bluetooth range, the connection will fail. In these situations, rely on cloud-based app control rather than direct Bluetooth connectivity.
If Bluetooth pairing fails repeatedly, forget the device in your phone's Bluetooth settings and attempt re-pairing from scratch. Occasionally, corrupted pairing data prevents reconnection. Also verify that your phone's Bluetooth is enabled and that airplane mode is off. For persistent issues, try restarting both your phone and the mower's system, allowing each device to reinitialize its wireless systems fresh.
Dock Docking Failures and Alignment Corrections
If your mower struggles to dock successfully, the issue typically involves either alignment miscalibration or dock placement problems. The mower uses visual markers and RTK positioning to approach and dock with the charging station. If the dock's infrared docking sensors aren't properly aligned with the mower's charge receptors, docking fails despite correct approach.
Verify that your charging dock is level and sits on stable ground. Even slight tilts can misalign the charging contacts. Clean both the dock's contact pins and the mower's charge receptors with a soft, dry cloth—accumulated dirt or corrosion prevents proper electrical connection. If the mower consistently approaches the dock correctly but fails to seat fully, try manually aligning the mower with the dock and pushing gently—sometimes this forces contact while allowing you to observe any physical obstruction preventing proper seating.
Maintenance and Seasonal Preparation for Long-Term Success
Post-Installation Blade Inspection and Sharpening
Even before your first autonomous mowing cycle, inspect the mower's blades for any shipping damage or manufacturing defects. Check that blades rotate freely and are securely fastened. During initial operation, keep an eye on cutting quality—if grass appears torn or ragged rather than cleanly cut, blades may need sharpening.
The Navimow i Series uses replaceable blade cartridges designed for easy maintenance. Most homeowners should expect to replace blades every 2-3 months of regular use, though this varies based on lawn size, mowing frequency, and grass type. Sharpen or replace blades when you notice diminished cutting quality, usually indicated by slightly elevated mowing times or visible grass tear marks.
Dock Cleaning and Connection Maintenance
Weekly dock maintenance takes just a few minutes and prevents most connection issues. Wipe the charging dock's contact pins with a soft cloth to remove dust and debris. Check for any corrosion or discoloration on the contacts, and if present, gently clean with a small brush or cloth dampened with vinegar.
Inspect the area around the dock for accumulating leaves, grass clippings, or other debris. Clear away anything that might interfere with the mower's approach or dock alignment. During rainy periods, occasionally check that water isn't pooling around the dock or near electrical connections. Proper drainage and cleanliness prevent electrical issues and ensure reliable charging.
Preparing for Seasonal Changes
As seasons transition, your mower's operation needs adjustment. Spring activation after winter storage requires checking that all components still function properly. Power on the system and run a brief test cycle to verify that RTK positioning, obstacle detection, and docking all work correctly before re-establishing regular schedules.
During summer months when grass grows rapidly, increase mowing frequency. In fall, adjust schedules to match slowing growth rates. Before winter dormancy, perform a final maintenance check, clean the dock thoroughly, and consider storing the mower indoors if your climate involves heavy snow or prolonged freezing. Document your mower's condition and settings so you can quickly resume operation when spring arrives.
Spring Recommissioning and System Recalibration
When returning the Navimow i Series to regular operation after winter storage, take time to recalibrate critical systems. Power on the mower and allow it to run through its full startup sequence. Verify RTK signal strength at your dock location—winter weather changes sometimes affect reception, potentially necessitating dock relocation.
Review your mowing map in the app—if you've added landscaping, removed garden structures, or otherwise modified your yard over the off-season, update the map accordingly. Run a brief test cycle observing the mower's performance before establishing full autonomous schedules. This methodical approach catches any issues that winter storage or environmental changes may have created, ensuring smooth operation throughout the mowing season.
Comparing i105 vs. i110: Which Model Suits Your Lawn?
Coverage Area Specifications and Lawn Size Assessment
The Navimow i105 is engineered for lawns up to 1/8 acre, while the i110 handles properties up to 1/4 acre. These specifications represent the maximum area each model can maintain with scheduled mowing. To determine which model suits your lawn, calculate your mowing area's square footage and compare against these limits.
For example, a 1/8 acre equals approximately 5,445 square feet. A rectangular lawn measuring 100 feet by 54 feet would be right at the i105's upper limit. The same lawn would be well within the i110's 10,890 square foot capacity. If your lawn approaches either model's maximum, consider your grass type and climate—lawns in cool, wet climates with rapid growth might benefit from selecting the larger model to ensure adequate mowing frequency even during peak season.
Performance Differences in Mowing Speed and Battery Endurance
The i110 offers extended battery runtime compared to the i105, allowing longer uninterrupted mowing sessions and faster coverage of larger areas. For lawns occupying 1/5 acre or more, the i110's superior endurance prevents the awkward situation where a single mowing cycle takes most of the available daylight hours.
Conversely, the i105's sufficient runtime for smaller lawns eliminates unnecessary battery capacity—you pay only for the performance your lawn actually requires. For properties under 1/10 acre, the i105's smaller size makes it more nimble around obstacles and easier to manually reposition if needed, though autonomous operation typically makes manual repositioning unnecessary.
Price Point Comparison and Value Proposition
The Navimow i Series generally ranges from approximately $799 to $1,299, with the i105 positioned at the lower end and the i110 at the higher end of this range. The price difference reflects extended coverage capability rather than fundamentally different technology. Both models feature identical RTK + Vision positioning, the same 140-degree obstacle detection camera, and equivalent AI mapping capabilities.
When evaluating value, consider the annual cost of traditional lawn care—weekly professional mowing service can cost $30-60 per visit, totaling $1,500-3,000 annually. A Navimow purchase pays for itself within a year in many situations while providing superior convenience. Additionally, your mower operates entirely on electricity at minimal operational cost, producing zero emissions compared to gas-powered alternatives.
Making Your Lawn Autonomous: Next Steps Forward
Setting up your Navimow i Series is remarkably straightforward—the wire-free RTK + Vision system handles the complexity so you don't have to. From unboxing through that first autonomous mow, you've got the tools and knowledge to configure a mower that works precisely for your lawn's unique layout. The real payoff arrives when you stop thinking about lawn maintenance altogether, as your mower runs on schedule, navigates obstacles intelligently, and returns itself to the dock without your intervention.
Start with the pre-installation checklist to ensure your dock location offers adequate RTK signal reception and WiFi connectivity. Take your time with the initial mapping phase—accurate boundary definition and no-mow zone specification at the beginning prevent frustration later. Don't hesitate to fine-tune your map through the app after observing your mower's first test cycles. Each adjustment you make teaches the system more about your specific yard's layout, improving performance incrementally.
During those first few weeks of operation, actively monitor your mower's performance. Watch how it navigates obstacles, verify that it respects your no-mow zone boundaries, and confirm that it docks reliably. These observations allow you to identify and correct any setup issues while you're still actively observing the system. By the time you've established several complete mowing cycles, you'll have confidence that your Navimow i Series fully understands your lawn and operates with precision.
Seasonal maintenance is minimal compared to traditional mower ownership. Weekly dock cleaning and periodic blade maintenance keep everything in working order. Weather detection automatically pauses operation during rain, ensuring your lawn stays healthy while your mower stays dry. The app provides visibility into your mower's status anytime, anywhere, giving you peace of mind that your lawn care continues automatically.
Your perfectly maintained lawn is waiting.
Start your journey to wire-free lawn maintenance with the Navimow i Series today.