Discover how to create a cohesive living room design centered on the Riverside Coventry Entertainment Console. Learn styling tips, color coordination, and layout strategies to maximize both aesthetics and functionality in your space.
Your living room is where style meets functionality—and yet, most people treat their entertainment console as an afterthought rather than a design anchor. The space that should reflect your personality and taste often becomes a cluttered, disconnected collection of furniture and electronics. This is where intentional design makes all the difference.
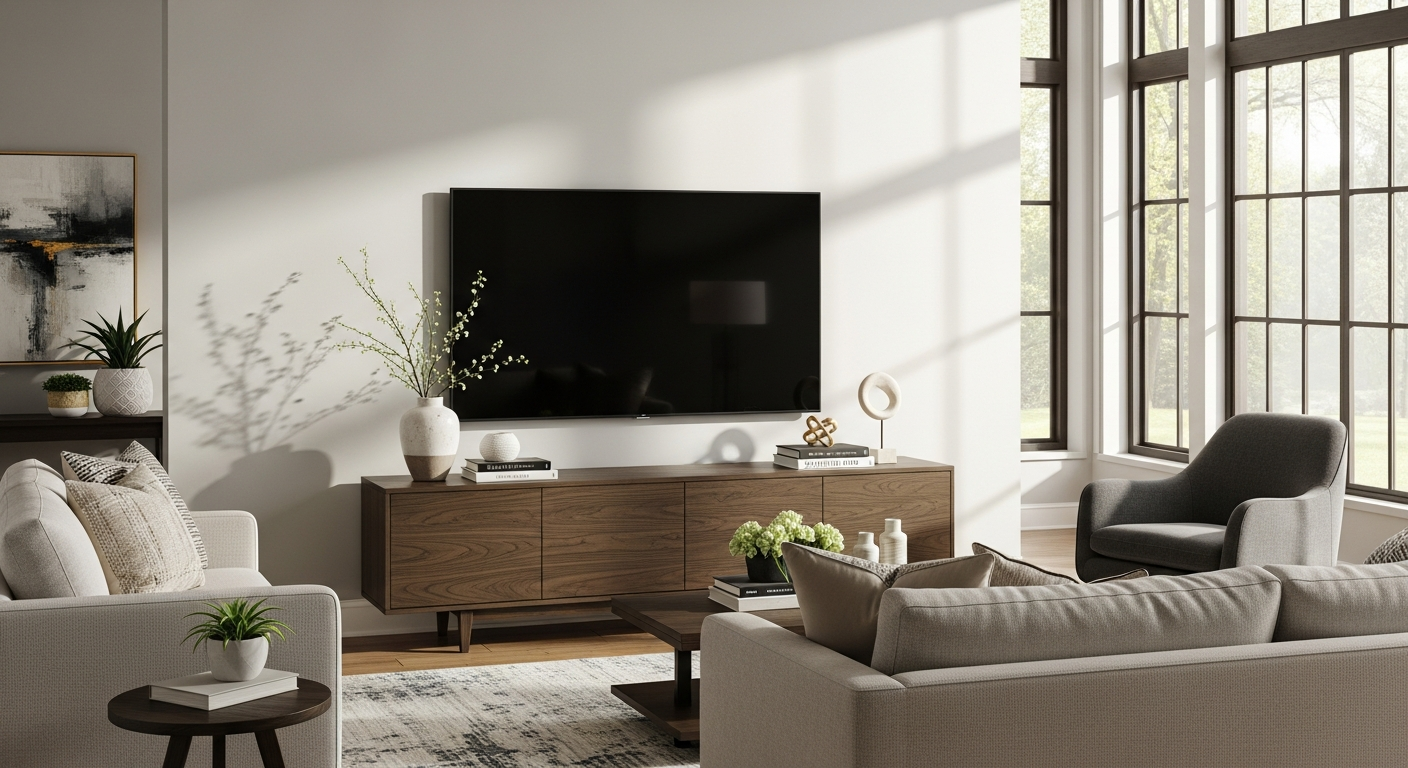
The Riverside Coventry Entertainment Console represents something rare in today's furniture market: a piece that bridges timeless elegance with practical modern living. Constructed from premium materials like oak solids and cherry veneers, finished in sophisticated options ranging from rich cherry to Weathered Driftwood, this console isn't just storage—it's an architectural statement that anchors your entire living room aesthetic.
Explore the Riverside Coventry Entertainment Console to begin your living room transformation.
Selecting the Perfect Finish to Match Your Design Vision
Understanding the five finish options: cherry, oak, Cresent Oak, Weathered Driftwood, and Dover White
The first decision you'll make shapes everything that follows. Each finish tells a different story. Rich cherry evokes warmth and traditional elegance, while solid oak brings a lighter, more versatile foundation. Cresent Oak sits somewhere between, offering neutral versatility without sacrificing character. Weathered Driftwood introduces coastal or farmhouse elements with its softer, silvered tones. Dover White provides a clean slate for those leaning toward transitional or contemporary interpretations of classic design.
How distressed wood finishes create visual depth and complement different interior styles
The lightly distressed finish on the Coventry console isn't a flaw—it's intentional craftsmanship. These subtle imperfections catch light differently than smooth surfaces, creating visual texture that photographs beautifully and feels authentic in person. The distressing complements traditional, farmhouse, and transitional styles particularly well, though it works equally in contemporary spaces seeking warmth and character.
Matching the console's antique brass hardware to existing fixtures and décor accents
The antique brass drawer pulls deserve attention. These hardware pieces establish a design thread you'll follow throughout the room. Scan your existing fixtures: light switch plates, door handles, picture frame corners, lamp bases. If you have warm brass tones already present, your console choice becomes easier. If you're starting fresh, the antique brass becomes your design anchor for selecting other metal finishes in the room.
Considering undertones: warm finishes (cherry, oak) versus cool tones (Weathered Driftwood)
Warm finishes create cozy, inviting atmospheres and pair naturally with golden lighting and warm wall colors. Cool-toned finishes like Weathered Driftwood work beautifully with crisp whites, cool grays, and modern color palettes. Your choice here influences every subsequent decision about wall color, lighting temperature, and accent colors.
Creating a Color Palette That Complements Your Console
Building a cohesive color scheme around your chosen console finish
Once you've selected your console finish, it becomes the gravitational center of your color scheme. Pull three to four accent colors from the room's natural lighting conditions and the console's undertones. If you've chosen cherry, consider warm terracottas, deep blues, or forest greens. Weathered Driftwood pairs beautifully with soft whites, pale blues, and muted sage tones.
Using the 60-30-10 rule: letting the console anchor 60% of your room's visual weight
This principle ensures the console commands attention without overwhelming the space. The console occupies roughly 60 percent of the visual weight through its size and presence. Your secondary color (30 percent) appears in larger soft furnishings like an area rug or sofa. The final 10 percent comes through accent colors in pillows, artwork, and accessories. This balance creates visual harmony while maintaining the console as the clear focal point.
Selecting wall colors that enhance rather than compete with the console's elegant styling
Wall color either amplifies or diminishes your console's impact. Light, neutral walls (creams, soft grays, whites) let an ornate console command full attention. If your console is simpler in line, walls can introduce subtle color—a warm sand tone or pale blue that echoes the console's undertones. Avoid wall colors that directly compete with the console's finish or hardware in saturation or warmth.
Incorporating accent colors through pillows, throws, and artwork without overwhelming the space
Textiles and artwork should feel intentional, not scattered. Choose two accent colors maximum and repeat them across different elements. A deep teal might appear in throw pillows, a framed landscape, and a decorative vase. This repetition creates cohesion while maintaining the console as the primary visual anchor.
Strategic Furniture Placement for Maximum Impact
Positioning the console as the focal point: wall placement, viewing angles, and sightlines
Mount the console on the wall opposite your primary seating, where it becomes the natural gathering point. Consider sightlines from the room's entry—the console should be visible and welcoming. Ensure adequate wall space on either side for balanced negative space. A console positioned too close to a corner loses its architectural presence.
Determining optimal TV size and mounting height relative to seating arrangements
The television mounted on the console should sit at eye level when seated. For most seating arrangements, this means 42 to 55 inches from the floor to the center of the screen. The console itself should comfortably accommodate your TV without appearing cramped or oversized. A 58-inch console with hutch can handle most contemporary television dimensions while maintaining proportion.
Creating balanced negative space around the console to avoid a cluttered appearance
Empty wall space around the console isn't wasted—it's intentional breathing room that prevents the room from feeling cramped. Leave at least 18 inches of wall visible on either side of the console, and consider the space above carefully. A console with hutch creates its own visual weight; a standalone console might balance better with artwork or a mirror on the wall above.
Arranging secondary seating to complement rather than block the console view
Secondary seating—chairs, benches, accent tables—should angle toward the console without blocking sightlines from the primary seating. Consider floating furniture arrangements where pieces face each other and the console, creating intimate conversation zones within the larger room.
Mastering Cable Management for a Polished Aesthetic
Leveraging the integrated wire access features to keep cables hidden and organized
The Coventry console's thoughtful wire access and management features aren't optional—they're essential to achieving that polished aesthetic. These built-in pathways allow cables to route discreetly rather than cascading messily behind the unit. Plan your component placement before installation so cables take the shortest, most direct path through these access points.
Using cable sleeves, clips, and management boxes to maintain the console's clean lines
Invest in quality cable management accessories. Black or matching-finish cable sleeves bundle similar wires together, reducing visual clutter. Adhesive clips secure cables along the back of the console, preventing them from shifting or tangling. For cables extending to the wall or floor, discreet management boxes hide connections and protect cables from damage.
Planning component placement for accessibility without visibility
Position components (cable boxes, streaming devices, gaming consoles) where they're accessible for daily use but invisible from seated viewing positions. Shelves above or below the television mounting area work well, as do cabinet interiors with ventilation to prevent heat buildup.
Creating a labeling system that makes future adjustments simple and stress-free
Use small, matching labels on each cable's end, corresponding to a master diagram kept inside the console door. This system saves hours of frustration when you need to adjust components or troubleshoot connections. Future you will be grateful for present-day clarity.
Lighting Strategies to Showcase the Console's Craftsmanship
Layering ambient, task, and accent lighting around your entertainment setup
Professional designers know that layered lighting creates dimension and flexibility. Ambient lighting (ceiling fixtures or recessed lights) provides overall illumination. Task lighting near seating supports reading or activities. Accent lighting specifically highlights the console's design details and finishes.
Using LED strip lighting inside glass-front cabinets to highlight décor and create warmth
If your console features glass-front cabinets, warm LED strip lighting inside transforms them into design features. Install strips along the top interior edge, angling light downward to illuminate both items and the cabinet interior. This creates visual warmth and draws attention to your curated décor within.
Positioning floor lamps and table lamps to illuminate the console's wood grain and hardware details
Place floor lamps flanking the console or positioned at 45-degree angles to the main wall. This angled light grazes the console's surface, highlighting the wood grain texture and creating shadow definition that emphasizes the distressed finish and brass hardware.
Incorporating dimmers to adjust mood and highlight the console's elegance during different times of day
Dimmers allow you to adjust lighting intensity based on time of day and activity. During evening entertainment, lower ambient lighting draws focus to the television and console-mounted accent lights. During day, brighter ambient light balances natural window light and prevents screen glare.
Storage Organization That Maintains Visual Harmony
Categorizing items: media components, DVDs, gaming systems, and decorative pieces
Organize storage by category and frequency of use. Components accessed regularly belong in open shelves or easily accessible cabinet areas. DVDs and less-used items can occupy deeper storage. Decorative pieces earn visible placement where they contribute to the room's overall aesthetic.
Using the 70-30 principle: filling 70% of visible storage with curated items and leaving 30% breathing room
Filled-to-capacity shelves look cluttered and diminish the console's elegance. Instead, fill 70 percent of visible storage space with carefully chosen items and leave 30 percent intentionally empty. This breathing room prevents visual overwhelm and highlights each displayed piece.
Using matching storage boxes, baskets, and organizers to create a unified look inside cabinets
Conceal less-attractive items inside matching storage boxes or woven baskets that complement your console's finish. Uniform storage solutions create visual continuity while keeping the interior organized and accessible. Consistent colors and materials make open cabinet interiors feel intentional rather than chaotic.
Styling shelves with a mix of functional items and meaningful décor for visual balance
Alternate functional pieces (media components) with decorative items (framed photos, small sculptures, books). Vertical items (tall vessels, stacked books) paired with horizontal items (small boxes, flat frames) create visual rhythm. Aim for asymmetrical balance rather than perfect symmetry, which can feel stiff.
Coordinating Décor Elements for a Cohesive Design
Selecting artwork, mirrors, and wall hangings that echo the console's traditional styling
Artwork above or beside the console should reflect the console's elegance without competing for attention. Traditional landscapes, botanical prints, or abstract pieces with warm undertones complement the Coventry's classic aesthetic. Mirrors can expand the sense of space while reflecting light and amplifying the console's visual presence.
Choosing decorative accessories that complement antique brass accents
Decorative pieces should echo the console's hardware finishes and material palette. Brass bookends, copper vessels, or gold-toned frames reinforce the antique brass theme. Avoid mixing too many metal finishes—stick to two at most (brass and wood, or brass and brushed nickel).
Incorporating textiles that tie the console's finish into the broader room design
An area rug anchors the console within the room's layout while introducing color and texture. Select rug patterns or colors that echo the console's undertones. Throw pillows, curtains, and table runners should reinforce your selected color palette and create visual connections between the console and other room elements.
Using scale and proportion to ensure décor pieces don't overwhelm the console's visual presence
Oversized artwork or décor pieces can dwarf the console. Select pieces in proportion to the console's scale—a console 58 inches wide calls for artwork roughly 36 to 48 inches across, not floor-to-ceiling installations. Decorative accessories should feel supporting, not competing.
Make Your Living Room Unforgettable
The Riverside Coventry Entertainment Console isn't simply a place to house your TV and media components—it's the foundation upon which an entire living room experience is built. Strategic choices about finish selection, color coordination, furniture placement, and often-overlooked details like cable management and lighting separate a merely functional space from a genuinely beautiful one. The console's premium construction, elegant hardware, and versatile finishes give you creative freedom to design a room that feels authentically yours.
Whether you're working with a traditional aesthetic or blending styles in a transitional space, this piece adapts to your vision while maintaining its sophisticated presence. Start with the finish that speaks to you, build your color palette with intention, and let every subsequent design choice reinforce the elegance you've anchored in that beautiful console. Your living room transformation begins with one bold decision.